OhDeedoh shared my high chair seat cover on their lovely site yesterday which brought a few new reader requests for the tutorial so here it is! Thank you for all of your lovely comments. I'm sharing a rough guideline for a customizable seat cover since you probably have a different sized high chair than ours.

You'll need to measure the width of your seat and add an inch to get the width for your fabric. Then measure from the edge of the seat base where your child's legs hang off to the bend in the seat and then as high up as you'd like your seat cushion to reach. Mine doesn't cover the wood all the way to the top but I would recommend it as new eaters are still wobbly! Add an inch to that measurement as well and you'll have the dimensions for your seat cushion. EX: 12" x 28"
I'll be using my dimensions as an example so substitute your own where applicable.
You'll Need: 1 cut of fabric measuring 12" x 22" and one measuring 7" x 12" for the front, one cut of fabric measuring 12" x 28" for the back, batting of preferred thickness (I used two layers of thin cotton batting) measuring 12" x 28", a strip of fabric measuring 2.5" x 85" for your binding, and 96" of grosgrain ribbon for your ties, sewing machine, scissors, iron, straight pins.

Place one 12" edge of the smaller cut of fabric on top of the 12" edge of the the other cut of fabric for your front with right sides facing each other and pin. Stitch together leaving a 1/4" seam allowance. Press seam toward the top.
 Layer your pieces like a sandwich starting with the back fabric (right side facing down), batting, and the front fabric (right side facing up). Pin together.
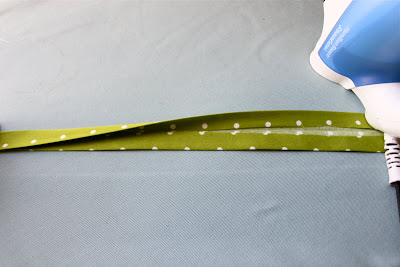
Create your binding by cutting enough fabric strips to measure 2.5" x 85" and after joining them together to form one long strip, iron in the sides 1'4" and then fold in half and iron again.

Mark lines using white chalk or pins before quilting together. I used straight lines along the vintage fabric and then criss-crossed my stitches across the solid colored fabric.

Carefully attach your binding in your preferred method. I simply folded my binding over the edge of the quilted body stitching carefully to make sure I was stitching through both sides of the binding. To finish off your binding, fold your raw end under and overlap with the start of your binding making sure to line up the edges for a clean fit. Next, decide where your ties should be added. You'll need two near the top corners, two near the fold in the middle, and two on the sides near the bottom corners.
 Pin your ties down on the back of your seat cover making sure the ends are facing away from the cover and stitch down.
 Find out where your seat straps were designed to fit through your seat cover and mark with a pin. This may be below your fold.
Using your button hole setting, create a large enough button hole for your straps to fit through. Be sure NOT to stitch over your ties.
 Cut a straight line in the space inside your button hole and check for fit. Adjust as necessary.
 Test out your fit as you go. If you have any questions or need some clarification on the instructions feel free to leave them in the comment section below. I hope this was helpful and be sure to send me a link to your finished work so I can share it with my readers!
 xoxo,
xoxo,Rachel


14 comments:
That is so adorable! It's looks pretty simple. I love your fabric!
Soooo cute! Good job! I love that you see something you want to give a makeover and just do it!
Wonderful.
TaliaChristine
Thanks for sharing. Love the cover you made!
So darling, loving the fabric!
I was just thinking yesterday how ugly my highchair cover is and how I would love to know how to make a new one. Thanks for sharing this! :)
Where was this a year ago? I have the same high chair, always hated the cover, and thought it should come with at least 3 so I could change them out daily! They get soo messy! Thanks for this, at least the next kid will have a great cover!
Rachel, how do you do it all? I am in awe of your ability to care for your two young children and still find the creative energy to provide inspiration day after day!
4 giant gold stars for you!
Thank you so much for this little guide.
I just got some super fun new fabric in my stash and this is perfect!
Well that's a HUGE improvement. Much easier to look at rather than the ugly neutral original!
Beautiful! This is such a great idea - I have a lot of friends with toddlers and I'm always looking for little things to make for the kiddies.
Thanks for the tutorial and the wonderful inspiration.
oh wow your good i wish i was even a little craft like you
aaww what an awesome tutorial!!! i can't wait to make my son one for his. his high chair in an old one that his grandmother and dad used.
I have that exact high chair-and now i'm inspired to make a high chair cover for it just as lovely as yours!
VERY NICE!
Fantastic tutorial! Thank you!
Post a Comment