


The fancy new Red Velvet shop opened way back at the end of October (feels like ages ago) and I was deemed the Children's Section Stylist. I really wanted Elsie and Emma to make me a badge with my title but they had dresses to hang and cupcakes to make so I had to settle on a borrowed staple gun.
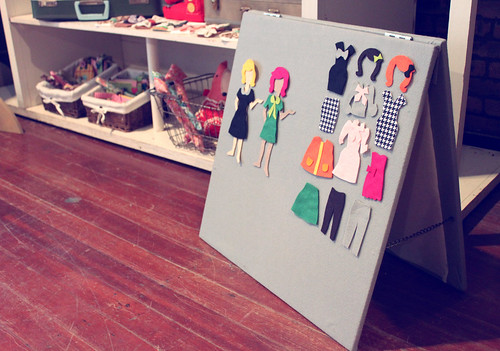
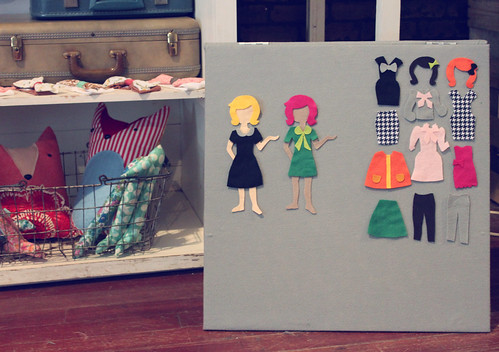
I wanted part of the children's section to include something interactive that kids could play with while their mamas and their papas shopped. I remembered the felt boards my Sunday School teachers utilized to teach stories from the Bible and paired that concept with paper dolls for a kid-friendly, dress shop-themed activity. I was also inspired by Olivia Mew's felt dress miniatures. She made one for each dress she didn't purchase and then stitched them together to create a human sized dress. I love the attention to detail and how realistic they look.

More than a few people have asked how to make their own felt board so I've listed my supplies and described the easy process of putting it together. I built the sandwich board in a hurry at night in low light so I didn't get any step-by-step photos but ya'll can do it!
You'll Need:
* 2 pieces of 3/4"x2'x2' plywood (similar to this). You can buy a larger sheet of plywood and cut it down but these come pre-cut at Lowe's for easy assembly.
* 1.5 yards of felt for your background (assuming length is 58") I used gray as a neutral.
* 1 yard of felt for your backing (assuming length is 58") Mine is white.
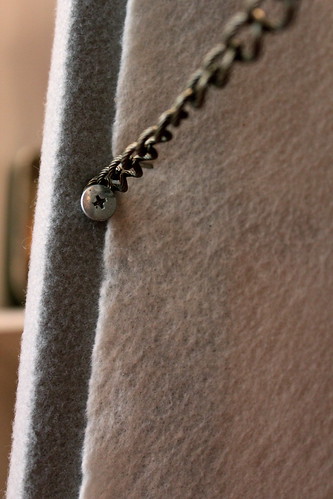
* Two hinges (similar to this) and screws that fit and are no longer than 3/4" long so as not to poke through like mine did.
* 20" of sturdy chain.
* 4 screws smaller than 3/4" long (to attach your chain) with wide heads
* Assorted felt for dolls and clothing
* Access to printer
* Staple gun and staples
* Pencil, ruler, electric drill, scissors, protective eyewear
Step One: Cut your outer felt to get two pieces that measure about 29" x 29". Lay each piece o felt down on your clean floor. Place one piece of wood on one piece of felt. Wrap one side of the felt over and staple in the center about 1.5" from the edge. Pull the opposite side taut and staple it in the center about 1.5" from the edge as well. Then staple the other two sides in the center. Check your front and make sure your felt is smooth and fits snugly to your board. Continue stapling opposite sides of your felt until it feels pretty secure. Fold your edges neatly like a present and trim excess felt.
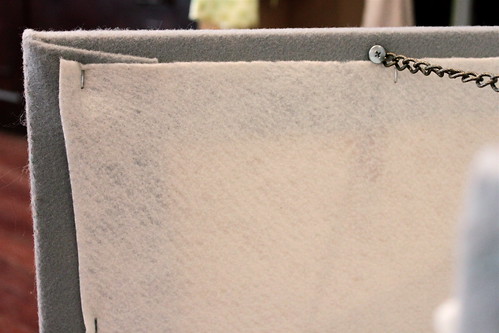
Step Two: Cut your backing felt so that you have two pieces measuring 23" x 23". For a quick job place one piece over the back of your board making sure it overlaps the front felt edges and staples. Secure it with staples about 3" apart. You could use spray adhesive for a more finished look.
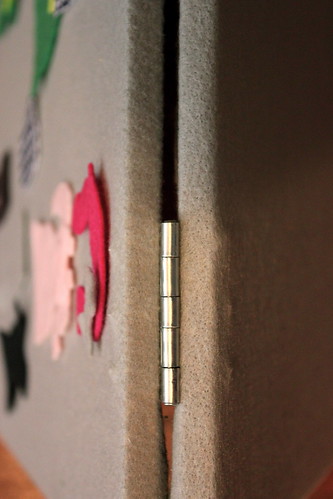
Step Three: Lay your wooden boards on the clean floor with the wrong sides facing up. Place them so the top edges are about 1/2" apart and place your hinges where you'd like them (I suggest about 3"-4" in from the outer edges). Make sure your hinges are also going to allow the boards to close the right direction. Mark your screw holes with a pen or pencil and set your hinges aside.
Drill pilot holes for your screws on one board and attach the hinges to that board. Then realign it with the other board and check your markings. Make sure your outer edges are lined up. Then drill and secure the other board to the hinges. Test to make sure it stands straight.
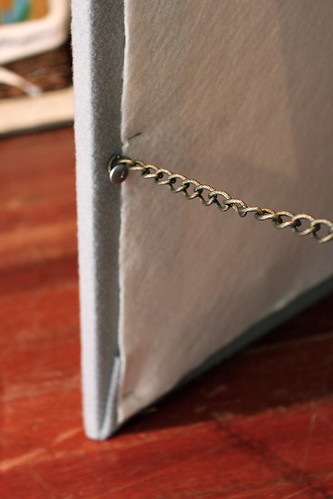
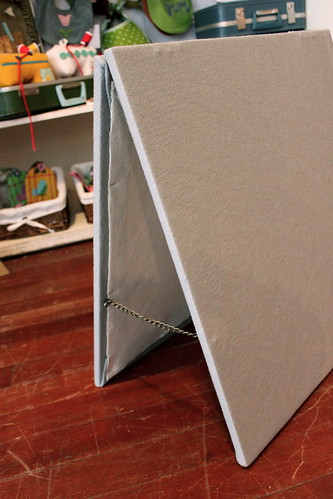
Step Four: Measure up between 6" - 8" from the bottom of your boards on the outer edges of both sides and drill pilot holes for your screws. Screw one end of your chain to the board. Stretch your board as wide as you'd like it in it's resting position and then cut your chain to fit. Screw the opposite end of the chain into the opposite board. You don't want your board to tip over when being used so make sure it's resting position is about 15" or more wide.
Then get your dolls set up and organize their clothing and accessories. I suggest you let your little ones help design their own clothing or design their own pets, toys, houses, etc. I think a few boy dolls would be nice for the little guys that want to play, too. The beauty of this sandwich board set up is that two or more children can play together or one side can be used as storage for felt shapes not in use.
Below I've included the same dolls and similarly styled outfits as the dolls at the Red Velvet store with new accessories! Just print them out onto card stock or paper and use them as templates for your new felt board.


There's plenty of time to make this a special Christmas present for your little girl(s) or favorite niece(s) and you'll be sure to make it on the nice list yourself! I'd love to see your version of my Dress Up felt board and share it with readers. Just send me an e-mail at racheldenbow (at) gmail (dot) com with a link to your blog and a photo of your creation! Please note the template provided is for non-commercial use only.
EDITED: I've had a few questions e-mailed about how the felt dolls stick to the board. Felt sticks to felt so just press it on the board lightly and it'll stay up. Just pull it off and readjust it over and over and it'll continue to have a strong hold unless it gets too dirty, I imagine.
EDITED: I've had a few questions e-mailed about how the felt dolls stick to the board. Felt sticks to felt so just press it on the board lightly and it'll stay up. Just pull it off and readjust it over and over and it'll continue to have a strong hold unless it gets too dirty, I imagine.
Thanks for your patience on this much anticipated project as we packed, moved, unpacked, and then got sick over here. Your readership means so much to me and I appreciate your encouragement and support!
I hope you have a lovely, unrushed weekend ahead of you.
xoxo,
Rachel
Rachel


43 comments:
love it! Thanks rachel, think we may be making one of those!
so cute <3
You made Bob Vila proud with this craft. Way to go, Mama.
This is darling! Love it!
Love love LOVE it! Thank you so much! I'm super excited to try this for my nieces.
Fantastic tute Rachel, and your felt board looks amazing with all those pretty little vintage-look clothes on your sweet dollies!
I hope you have a lovely un-rushed week ahead of you too :) Unfortunately, mine will be full of last-minute shopping, making,and baking...sheesh! I feel worn out just thinking about it!
Karen xx
http://karenmandersen.typepad.com
My mother made felt Christmas trees for my brother and I when we were little. They had little felt ornaments for us to decorate. Those trees were an AWESOME memory. Just wanted to share as an idea for your kiddos.
Have a very blessed Christmas!
Oh Rachel, thanks so much for posting this D.I.Y its such a cute idea! I definately need alittle gil now...although my little boy would love to play with this too!
xxx
Thank you so much for this tutorial, Rachel! I, unfortunately, don't have any appropriately-aged little ones for this, so I might just have to make one for myself!
This is the cutest! You could have so much fun making different outfits and hairstyles. I seriously love it :)
Yay thank you Rachel! I have been waiting for this, I'm a child photographer and I think it's perfect for the waiting room. It'll give the kiddos something to do! Thank you!
oh, man! i really hope i get around to making this next week. THANK YOU!
so cute rachel! i used to have a felt dress up board when i was little too. i think my aunt made it for me. maybe i will make one for my girls in the new year. ; )
thanks for the memory & inspiration.
xoxo. james.
ooh! love that you have patterns up! thanks! suggestion to anyone making this: if you trace the patterns onto freezer paper you can use an iron on cool to secure them to the felt for easier cutting. Peel off and reuse!
this just brought back memories of when i was a kid! i had something like this with little felt animals and a felt board. thanks for sharing! how sweet :)
We had felt boards when we were little! Although the people were definitely not as fashionable as these. So cute! :)
I had these in sunday school too! I loved them! Thanks for the tutorial! <3
Super cute! Now just to think of a way to make this for my little guy! I'm thinking Toy Story-esque somehow! :-)
Thanks for sharing Olivia Mew's flikr, I am totally in love with her work now!!
Thanks so much for sharing my piece, Rachel. I'm honoured to have been part of your inspiration for this! I really love what you did with it and it's such a great idea for a kids area. I was getting a bunch of blog and flickr hits this morning and couldn't figure out where they were coming from and then this popped up on my bloglovin feed! Ha. <3
SO creative.
Thanks for this Rachel, I think it is such an adorable idea!
love love love!! maybe i can make one for my daughter's first birthday?! thanks for the idea and instructions! xo
Liz
peachonearth.blogspot.com
Quite the nifty craft! I'm diggin' it!
George
Raised By Wolves
So cute and such a fun easy project! Thanks for posting this!
cI had a felt board growing up!!! Also had paper dolls its like the best of both worlds
Im so excited you posted this template. I am almost done making one for my little gal for christmas!
i guess felt boards are in the air!
my hubby has been planning to make one for my sons christmas gifts for months and got started on it this week...we used an easel and velcro(being a military family we only have so much space and the easel could to lots of other things too using the same space), we were thinking back on the church story boards that we ALL wanted to play with but never could... so he is making multiple "scenes" for it (medieval, ocean, forest, and zoo/ animal)
Felting onwards!
Thank you thank you! I saw Elsie's pictures and was going to try to make my own, but this makes it SO much easier. LOVE IT!
these are SOOOO cute! and the first thing I thought when I saw them was the felt board my Sunday School teacher used also!
~Andrea
So, am I missing something or how do you get the felt pieces to stick?
this is one of the best tutorials ever. Thanks for sharing!
bb, felt just sticks to felt so you just lightly press them to the board and they'll stay!
I started making these last night for my niece's Christmas present. Oh my goodness!!! It is so cute!! Thanks for putting up the tutorial!! I had been in Red Velvet and saw the one for the store and knew I had to make one. Instead of making the big board, I bought a keepsake box from Michael's, painted it, and lined the top of the lid with felt. Makes for easy traveling/storage! Once again, thanks so much!!
oh my gosh! darling! the details are amazing, even with a template mine wouldn't look like that! i want some of those dresses in my size!
oh, kidlets just love the felt board stuff! and your hair color switchableness detail is a superfun idea. i'll be posting about your tutorial on my little blog (w/credits and link.) thanks for sharing your creativity!
I saw this just before christmas and just has to make it for my six year old! I will admit I made it a bit more for me than for her. So cute, thanks for the idea! here's how it turned out http://www.flickr.com/photos/bobbyrue/5288034257/in/photostream/
Wow! this is a beautiful idea; I can't wait to make one for my daughter. Paper dolls are often too hard for her to use and the pieces get torn, so this idea is brilliant. Loving the 2 sided idea so both kiddos can go nuts.
Nice work!
Wow! this is a beautiful idea; I can't wait to make one for my daughter. Paper dolls are often too hard for her to use and the pieces get torn, so this idea is brilliant. Loving the 2 sided idea so both kiddos can go nuts.
Nice work!
I can't WAIT to do this with my kids! Thank you!
Oh my gosh, I LOVE it!!!
so fun! I've posted it on my blog, the handmade experiment - http://wp.me/pkcUM-EC. thanks!
Found you through Pinterest. What a super adorable idea...it will be our next project for sure. My 3 year old fashionista is going to love it!! Thank you for sharing it with us!
Post a Comment